K3S Raspberry Pi cluster with MetalLB
Introduction
In this blog post, I will walk you through my journey of establishing a compact k3s (Kubernetes) cluster using Raspberry Pis. From assembling the initial hardware to configuring the software, you’ll see how I brought my Raspberry Pi Kubernetes cluster to life. We’ll begin with an overview of the hardware arrangement, followed by an in-depth look at the software setup process.
My Hardware Setup
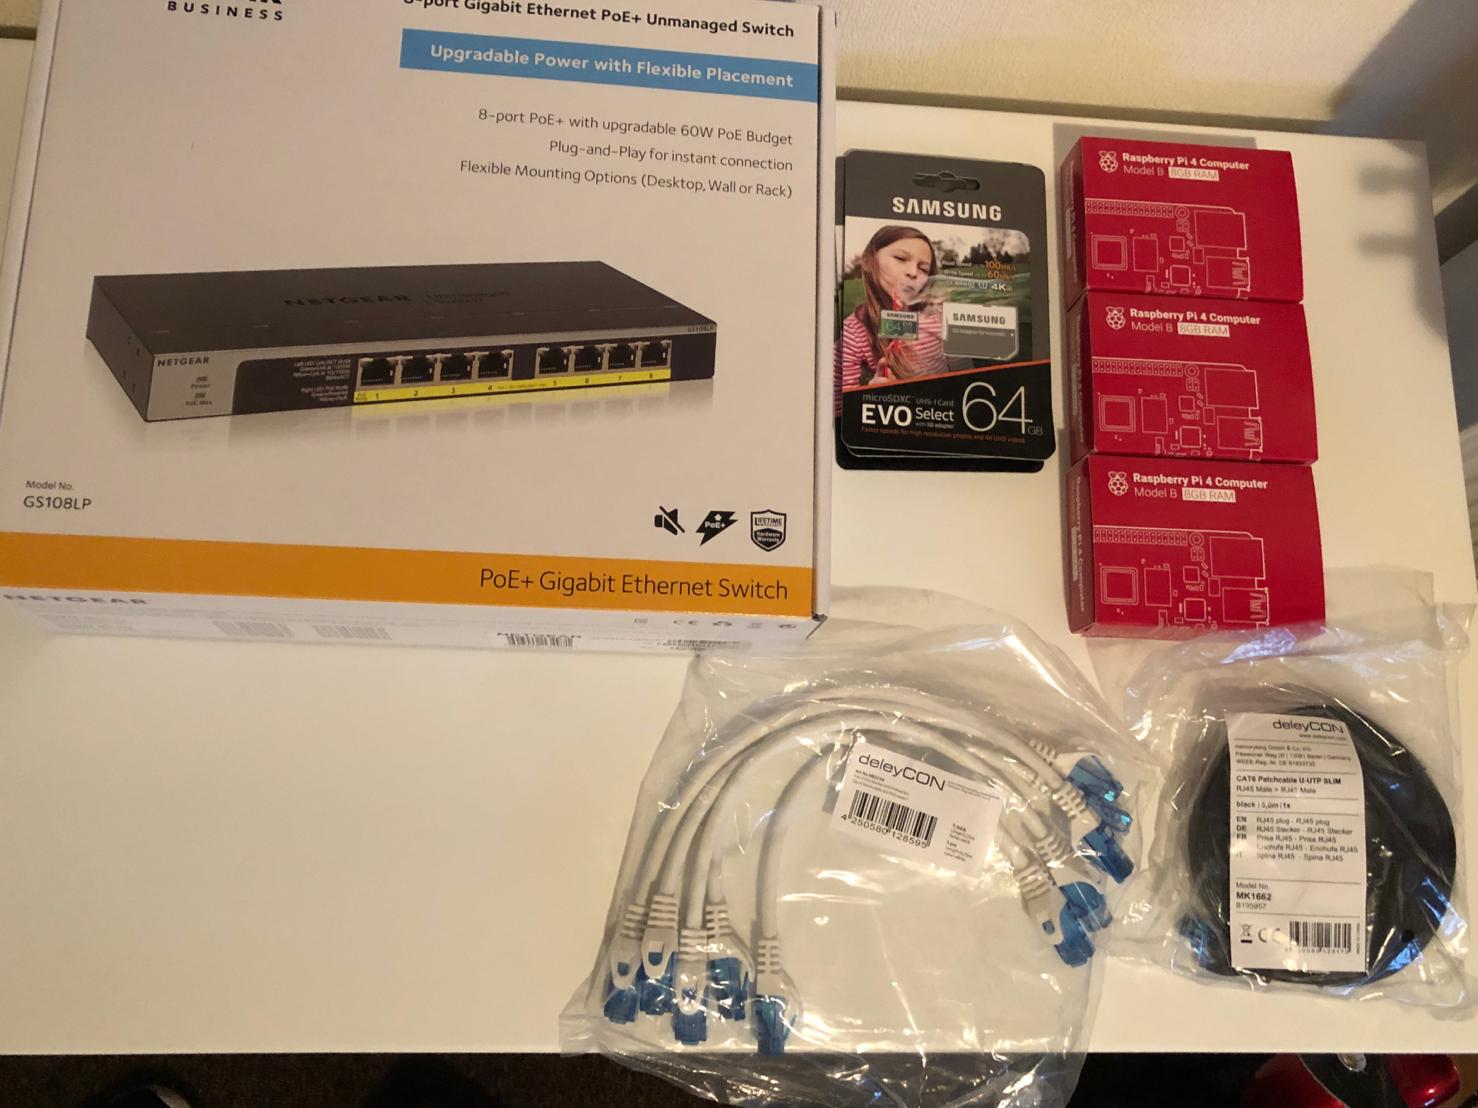
- 3 x Raspberry Pi 4
- 3 x Samsung MicroSDXC Memory Card
- 1 x Netgear PoE Switch 8 Port
- 3 x Short Cat 6 Ethernet cables
- 3 x Raspberry Pi 4 PoE Hat
- 1 x Consumer Router e.g. FRITZ!Box
Software
- Raspberry Pi Imager available for Mac, Windows, Linux
- K3S ansible github repo
- Rancher K3s
- Ubuntu for Raspberry Pi
- Kubernetes tools including kubectl
- Ansible (Optional)
- Visual Studio Code
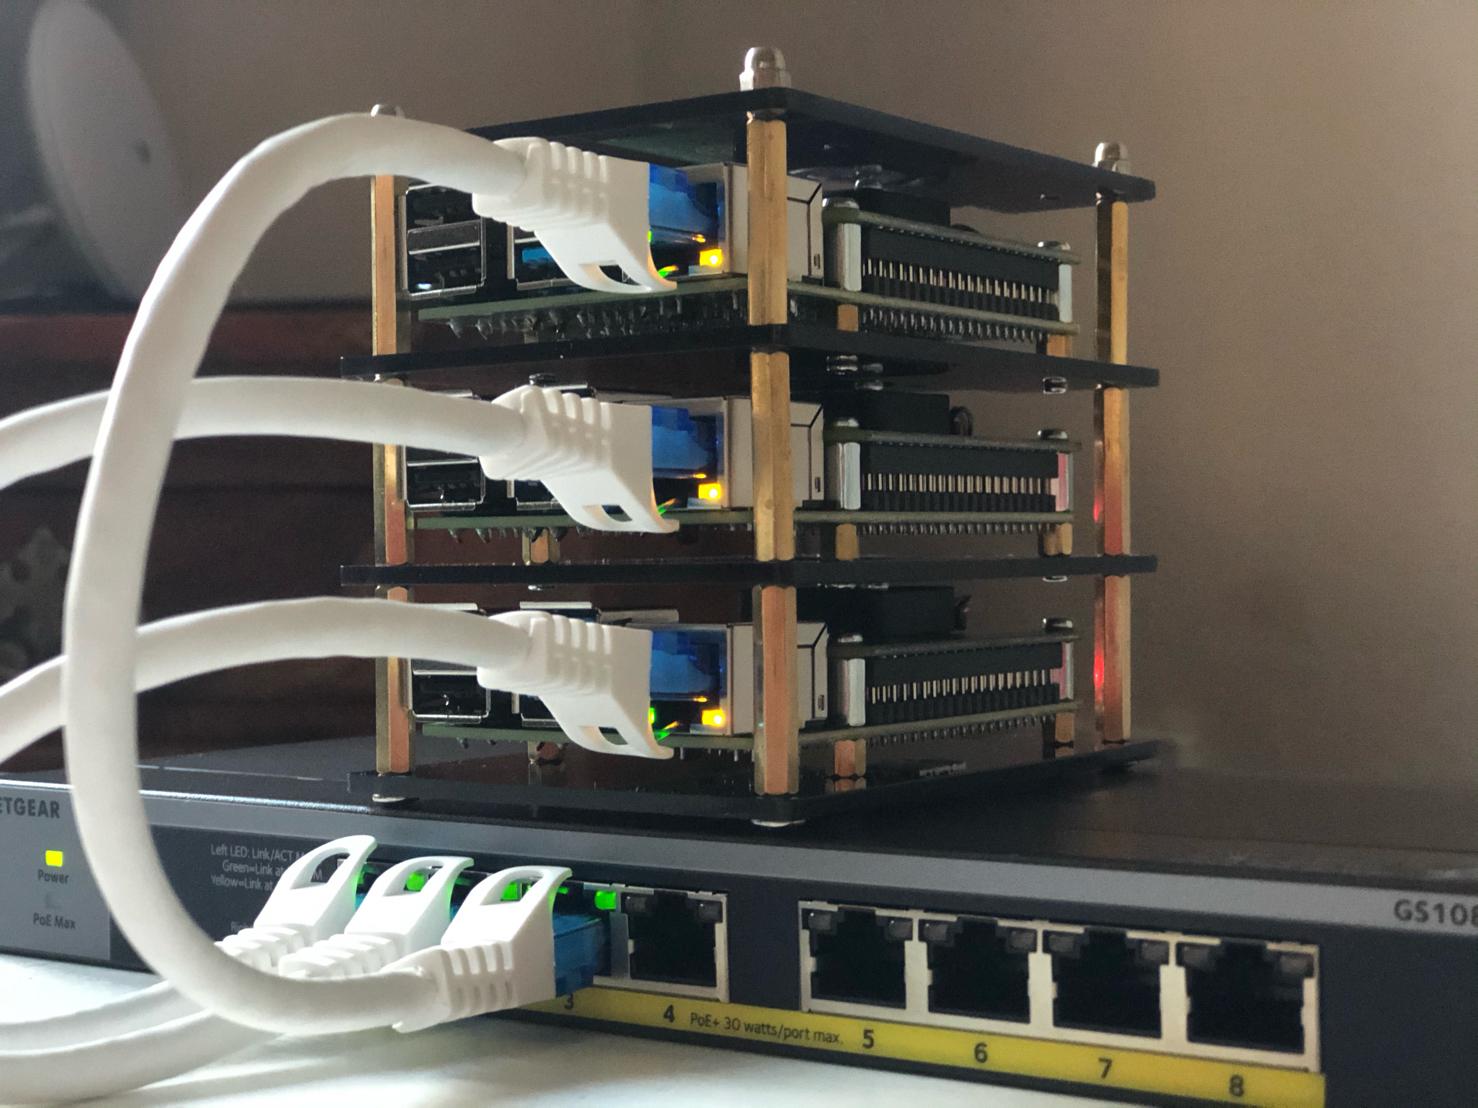
Installing Hardware
I’m going to leave you to the task of getting the RPis out of their boxes and connecting them up to the PoE switch, it’s pretty much plug and play.
Installing Ubuntu on Raspberry Pis
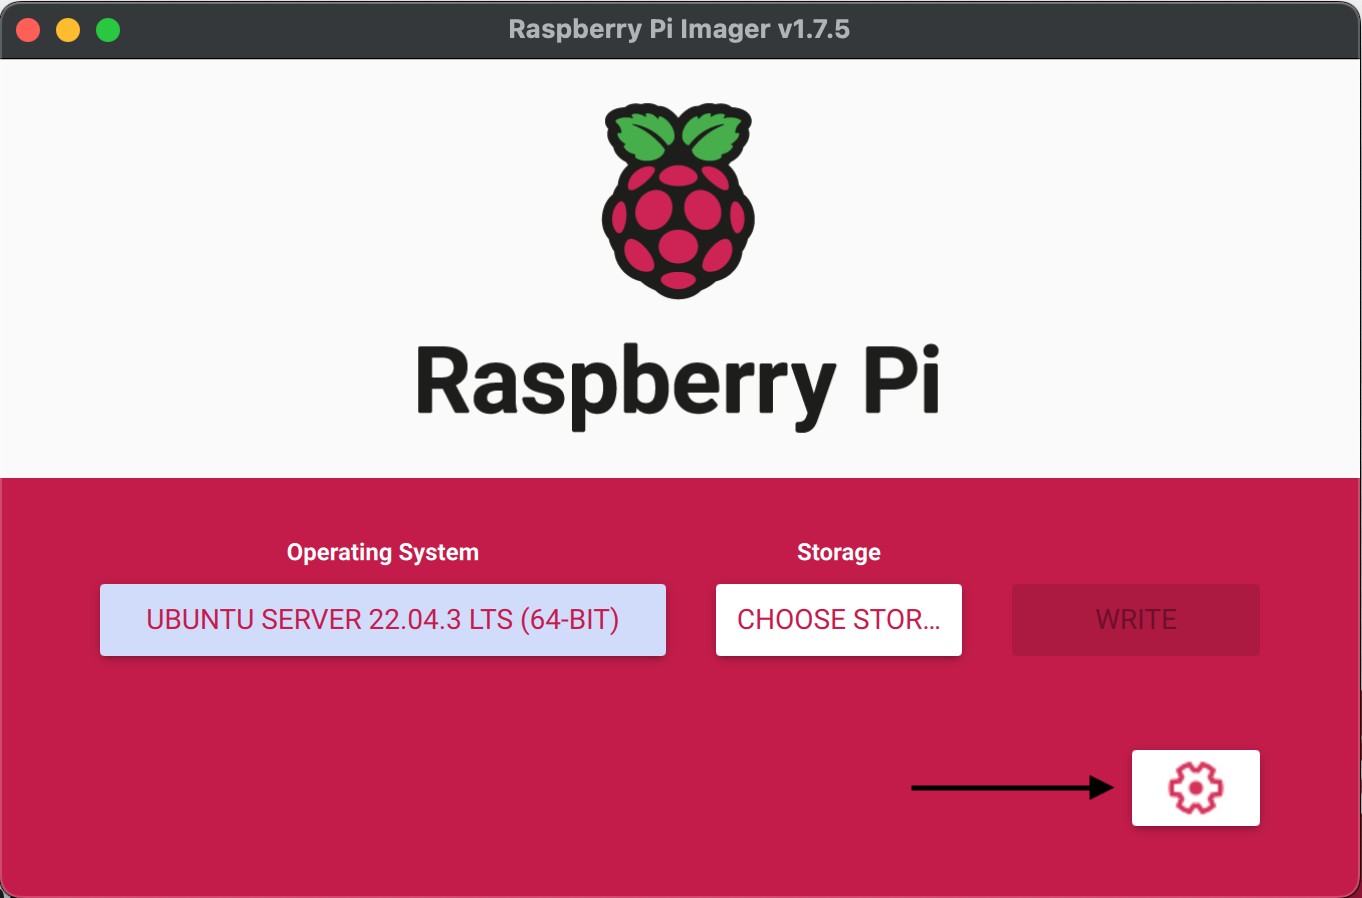
First, let’s go over the process of installing Ubuntu on our Raspberry Pis using the Raspberry Pi Imager tool.
- Download and install the Raspberry Pi Imager tool from https://www.raspberrypi.org/software/.
- Open the Raspberry Pi Imager and select “Choose OS.”
- Scroll down and select “Other general-purpose OS”.
- Then select “Ubuntu”.
-
Scroll through the list and choose the version of Ubuntu you’d like to install (In this case, it’s recommended to choose Ubuntu Server 22.04 LTS (64 bit) for Raspberry Pi Zero/2W/4/400).
-
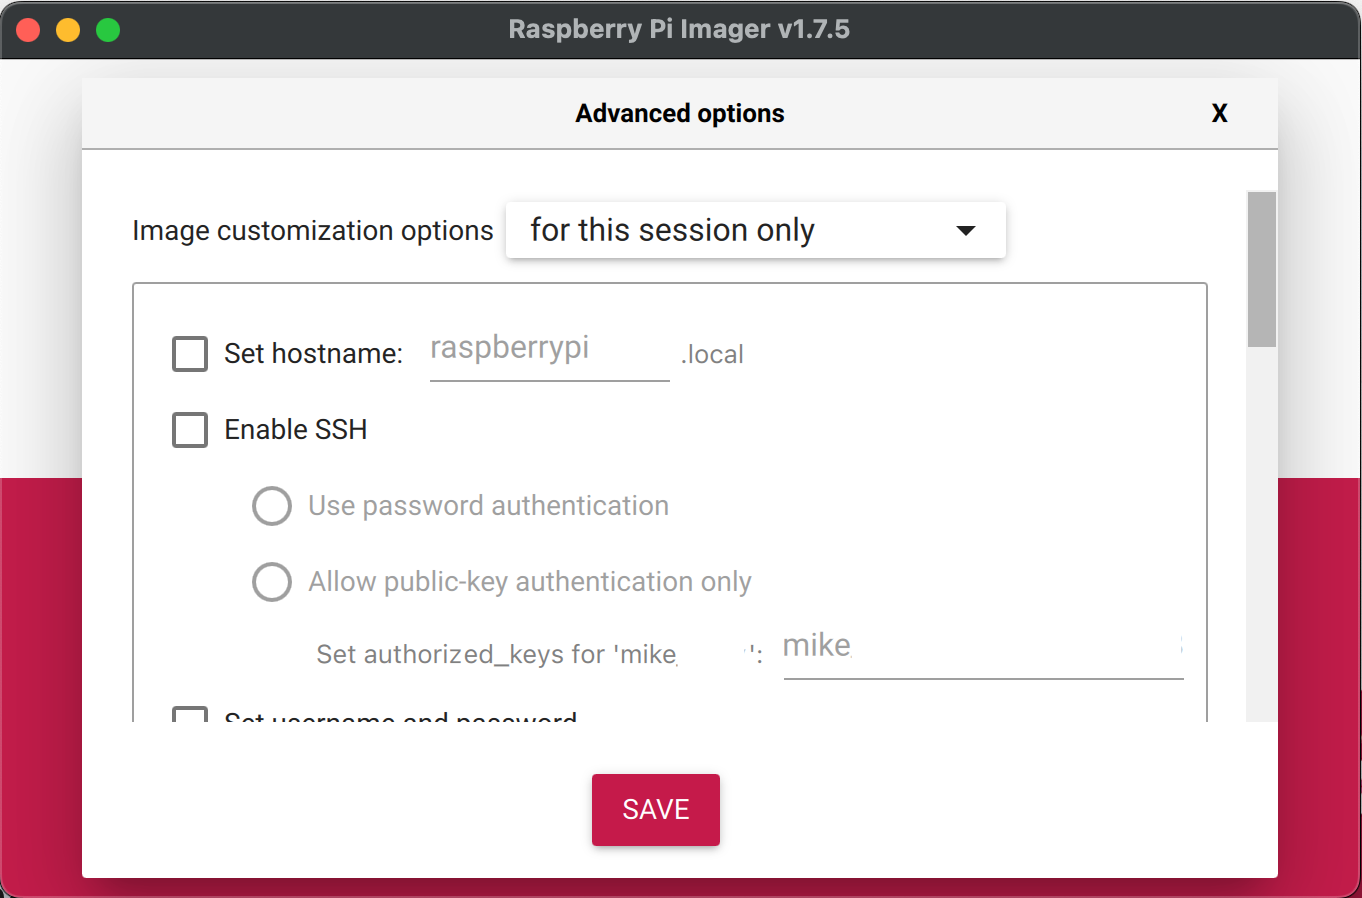
In the advanced options menu we can set the host name of our Pi which otherwise defaults to raspberrypi. This is also a good time to enable SSH and set a username and password to login to the Pi. Once happy with the settings click “SAVE”
- Insert your SD card into your computer.
- Under Storage select “CHOOSE STOR…” and choose the SD card you just inserted.
- Click on “WRITE” to start the imaging process.
The Imager tool will now write the Ubuntu image to the SD card, and once it’s finished, you can insert the SD cards into your Raspberry Pis connect them to your switch and power them on.
Find IP addresses of Raspberry Pis
Once the Raspberry Pi’s have started up, you may need to give them a little time to finish their first boot process, we can find out their IP addresses which we’ll need to ssh onto them and continue the cluster setup.
Couple of ways you can do this, firstly you could log onto your router and have a look at the network. Most routers will show you the IP address next to devices hostname.
If that’s not an option you can ssh onto the Pi using the username and password you picked in the imaging step.
SSH on Mac
Establishing an SSH connection on a Mac is incredibly simple. Open your Terminal and run the following command:
ssh username@hostname-or-ip
SSH on Windows via Putty
To SSH into your Raspberry Pi on a Windows computer, you can use the PuTTY program. Follow these steps:
- Download and install PuTTY from https://www.putty.org/.
- Launch PuTTY.
- In the ‘Host Name (or IP address)’ field, enter the hostname or IP address of your Raspberry Pi.
- Ensure the ‘Connection type’ is set to ‘SSH’ and the ‘Port’ is set to ‘22’ (which are the default options).
- Click the ‘Open’ button at the bottom of the window.
Once we’ve ssh’d onto our Pi we can run ifconfig which will display the network adapters and associated IPs. Assuming you are using ethernet to connect the IP address will be listed under eth0 on the second line next to inet and will look similar to inet 192.168.178.x netmask 255.255.255.0.
Set Hostnames on Ubuntu
Once you have Ubuntu up and running on your Raspberry Pis, if you forgot to set the hostnames or don’t like the one you picked you can change them in Ubuntu with the hostnamectl command. I’ve gone with an Avengers theme; capt (master node), thor and hulk (worker nodes).
-
Log in to each Raspberry Pi via SSH using the username and password you picked in the imaging step.
ssh username@hostname-or-ip -
Using the hostnamectl command give the Pi a new name.
sudo hostnamectl set-hostname new-name -
Next edit the /etc/hosts file, you could use nano or vi to do this and replace any existing occurance of the existing pi name with your new hostname
sudo nano /etc/hosts -
Save the changes and reboot the pi
sudo reboot
Setup PoE Hats Fans
To avoid having the PoE HATs fans constantly spinning, it’s essential (unless you like the noise) to configure their settings. If you’re not using PoE HATs on your Raspberry Pis, feel free to skip this step.
On each of the raspberry pi’s you’ll need to first ssh onto them and then edit the /boot/firmware/usercfg.txt file, you may see other articles that direct you to /boot/firmware/config.txt but if you are running Ubuntu it’s the usercfg.txt file you need to update.
sudo nano /boot/firmware/usercfg.txt
Add the following to the end of the file and save and exit ctl+X then Y and enter.
# PoE Hat Fan Speeds
dtparam=poe_fan_temp0=50000
dtparam=poe_fan_temp1=60000
dtparam=poe_fan_temp2=70000
dtparam=poe_fan_temp3=80000
You’ll need to reboot each Pi after the change, but when they restart you should be greeted with the sound of silence, unless the Pi is under load.
Install K3s on the Raspberry Pi’s
To Ansible, or not to Ansible: that is the question
Manual install vs. Ansible - 2023
As we travel further on our kubernetes homelab journey and look to install K3s on the Rasberry Pi’s, there are two options to choose from: But fear not, intrepid homelab installer! We’ve got you back, in this section we will delve into the pro and cons of each approach, ensuring you can make an informed choice for your Raspberry Pi Kubernetes journey.
Manual Installation: Wielding the K3s Install Script
For those comfortable with getting down and dirty, the manual approach to K3s installation allows you to dive into the nitty-gritty of setting up a cluster. K3s provides an easy-to-use installation script that sets up the necessary services on systemd or OpenRC-based systems.
Armed with the script from https://get.k3s.io, you can bring your Raspberry Pi Kubernetes cluster to life using the following command (remember to ssh onto your Pi first):
curl -sfL https://get.k3s.io | sh -
Is that it you ask? For getting your master node up and running it may well be (assuming you like all the defaults) once the script is finished you’ll have the following:
- Your K3s service will rise from the ashes after node reboots or sudden process terminations.
- Handy utilities such as
kubectl,crictl,ctr,k3s-killall.sh, andk3s-uninstall.shwill be at your disposal. - A kubeconfig file will be created in /etc/rancher/k3s/k3s.yaml, and the kubectl installed by K3s will use it automatically.
But wait, there’s more! At least there is if you want to setup a 3 node cluster like me. With the master node sorted, we’ll need to ssh onto the worker(agent) nodes and recruit them to the cause.
curl -sfL https://get.k3s.io | K3S_URL=https://myserver:6443 K3S_TOKEN=mynodetoken sh -
You’ll need to change the K3S_URL to match your master node (server) for me that’s https://capt:443 using the hostname we set earlier. The value for K3S_TOKEN can be found lurking at /var/lib/rancher/k3s/server/node-token on your master node (server).
Once your agents/worker nodes are signed up with the master/server you have a running K3s cluster. Steps to connect to it from your computer can be found after the Ansible instructions, see you there.
Automated Deployment: The Ansible Advantage
If you’re not a fan of manual installation, you might want to consider using Ansible for setting up your Raspberry Pi Kubernetes cluster. Ansible offers an automated way of installing our cluster using a playbook, and gives us a nice repeatable way to deploy our cluster.
By using Ansible for your K3s deployment, you can easily reset your cluster to its initial state whenever you feel like trying new configurations or applying upgrades. With this automated approach, you can sit back and relax while Ansible handles the complex tasks for you.
Install Ansible
On Mac this is pretty simple if you have Homebrew installed
brew install ansible
If you don’t have it installed visit brew.sh and follow the instructions.
If you are on Windows I suggest you take a look at the ansible docs it’s pretty simple but involves installing Python 3 first than then using it’s package manager pip to install Ansible.
Install K3s with Ansible
Head over to the GitHub repo for K3s and ansible and either clone or fork it. If you fork it a copy will be created in your account which you can then clone.
-
Navigate to a folder that you want to clone the code to I have
reposfolder in my user directory I use, when you clone use HTTPS unless you have an SSH key setup on your GitHub account. This will create a new folder underreposcalledk3s-ansible, switch to this folder and continue.cd repos/ git clone https://github.com/k3s-io/k3s-ansible.git cd k3s-ansible - Open the folder in your favourite code editor, I use VS Code
-
Create a new directory based on the
sampledirectory within theinventorydirectory. I named mine pi-cluster.k3s-ansible └── inventory └── pi-cluster │ ├── hosts.ini │ └── group_vars │ └── all.yaml └── sample ├── hosts.ini └── group_vars └── all.yaml -
Edit the
inventory/pi-cluster/hosts.inito match you IP addresses. This file communicates the K3s masters and nodes to Ansible during the K3s installation process, mine looks like:[master] 192.168.178.50 [node] 192.168.178.51 192.168.178.52 [k3s_cluster:children] master node -
Modify the
inventory/pi-cluster/group_vars/all.ymlfile and update the ansible_user to the one you set earlier in my case it’smike.--- k3s_version: v1.28.2+k3s1 ansible_user: mike systemd_dir: /etc/systemd/system master_ip: "" extra_server_args: "" extra_agent_args: "" -
With the config done we can kick off provisioning the cluster with the following command (-K prompts you for the Pi sudo passsword):
ansible-playbook site.yml -i inventory/pi-cluster/hosts.ini -K -
Once the cluster has been installed, you’ll be able to move onto the next section and connect to it using
kubectl. -
In the event that you need to uninstall the cluster you can use Ansible for that as well. Simply run the following command.
ansible-playbook reset.yml -i inventory/pi-cluster/hosts.ini -K -
You can also use Ansible to shutdown the cluster using.
ansible all -i inventory/pi-cluster/hosts.ini -a "shutdown now" -b -K
So, which path will you choose for your Raspberry Pi Kubernetes adventure? Whether you prefer to go hands-on with K3s installation scripts or let Ansible work its magic, the choice is yours. Armed with knowledge and guidance, you’re now ready to dive into the exciting world of Raspberry Pi Kubernetes clusters. And always remember, when it comes to choosing between Manual and Ansible, there’s no wrong answer – it’s all about finding the approach that fits you best.
Setup K3s cluster connection
Before we can use the K3s cluster we are going to need to install kubectl which provides a way of administering our cluster from our computers.
Install kubectl on Mac
Homebrew to the rescue again, installing on Mac with homebrew is as simple as.
brew install kubectl
We can test kubectl is up-to-date with the following command.
kubectl version --client
Install kubectl on Windows
We can use Chocolatey or winget to install kubectl.
Choco
choco install kubernetes-cli
winget
winget install -e --id Kubernetes.kubectl
We can test kubectl is up-to-date with the following command.
kubectl version --client
Connecting with kubectl
Now we have the installation of kubectl on our computer we can finally connect, well we can almost connect. First we need to ssh onto our master node and run the following command.
sudo cat /etc/rancher/k3s/k3s.yaml > kubeconfig.txt
Copying kube config to Mac
On Mac, we can use SCP to copy the config from the master node to our computer.
scp username@master-node:~/kubeconfig.txt ~/.kube/config
Once copied, we need to edit the file and change the 127.0.0.1 IP to the IP of the master node (e.g. 192.168.178.50).
sudo nano ~/.kube/config
After making the change, save and exit Ctrl+X then Y and Enter. We are now ready to connect.
Copying kube config to Windows
First lets setup the .kube directory to store the kubernetes config.
-
Navigate to your home directory and create the
.kubedirectorycd ~ mkdir .kube -
Change to the
.kubedirectory we have created and create a new config filecd .kube New-Item config -type file
Now that you’ve created the config file, use a file transfer tool like WinSCP to copy the kube config from the master node to your local .kube folder.
- Download and install WinSCP from https://winscp.net/eng/download.php.
- Launch WinSCP and set up a new connection.
- Choose the ‘SFTP’ file protocol and enter your Raspberry Pi’s IP address or hostname in the ‘Host name’ field.
- Enter your Raspberry Pi’s username and password, then click ‘Login’.
- In the remote pane (right side), navigate to the home directory and locate the ‘kubeconfig.txt’ file.
- In the local pane (left side), navigate to your Windows user’s home folder. Then, enter the
.kubedirectory that you created earlier. - Drag and drop (or use F5) the
kubeconfig.txtfile from the remote pane to the local .kube folder. After the transfer is complete, rename the file fromkubeconfig.txttoconfigin the local pane.
Once the file is copied and renamed, you’ll need to edit it and change the 127.0.0.1 IP to the IP address of your master node (e.g., 192.168.178.50). You can use a text editor like Notepad++ to make the changes.
Save the changes and exit. We are now ready to connect.
Test the connection
With the kubectl setup we can now test that everything is configured properly. On your computer.
kubectl get nodes
Which should return something like.
NAME   STATUS   ROLES                  AGE    VERSION
capt   Ready    control-plane,master   2d1h   v1.28.2+k3s1
thor   Ready    <none>                 2d1h   v1.28.2+k3s1
hulk   Ready    <none>                 2d1h   v1.28.2+k3s1
Prepping for MetalLB
K3s comes pre-packaged with Klipper LoadBalancer (KlipperLB) aka StandardLB, it’s a bit limiting, it’s fine for small scale clusters but if you wanted to put this into production it’s not a great choice. MetalLB is a common replacement which works well in homelab setups. For the purposes of this guide we are going to remove KlipperLB and replace with MetalLB.
MetalLB is a useful tool for Kubernetes clusters in bare metal or on-premises environments like our Raspberry Pi cluster, where automatic service exposure through external load balancers is not available, Kubernetes assumes that your cloud provided will provide this component. MetalLB assigns IP addresses on the local network to Kubernetes services, making them easily accessible within the network. MetalLB uses Layer 2 (ARP/NDP) or BGP mode to dynamically provide and announce IP addresses, ensuring efficient load balancing and better fault tolerance for your services.
Networking
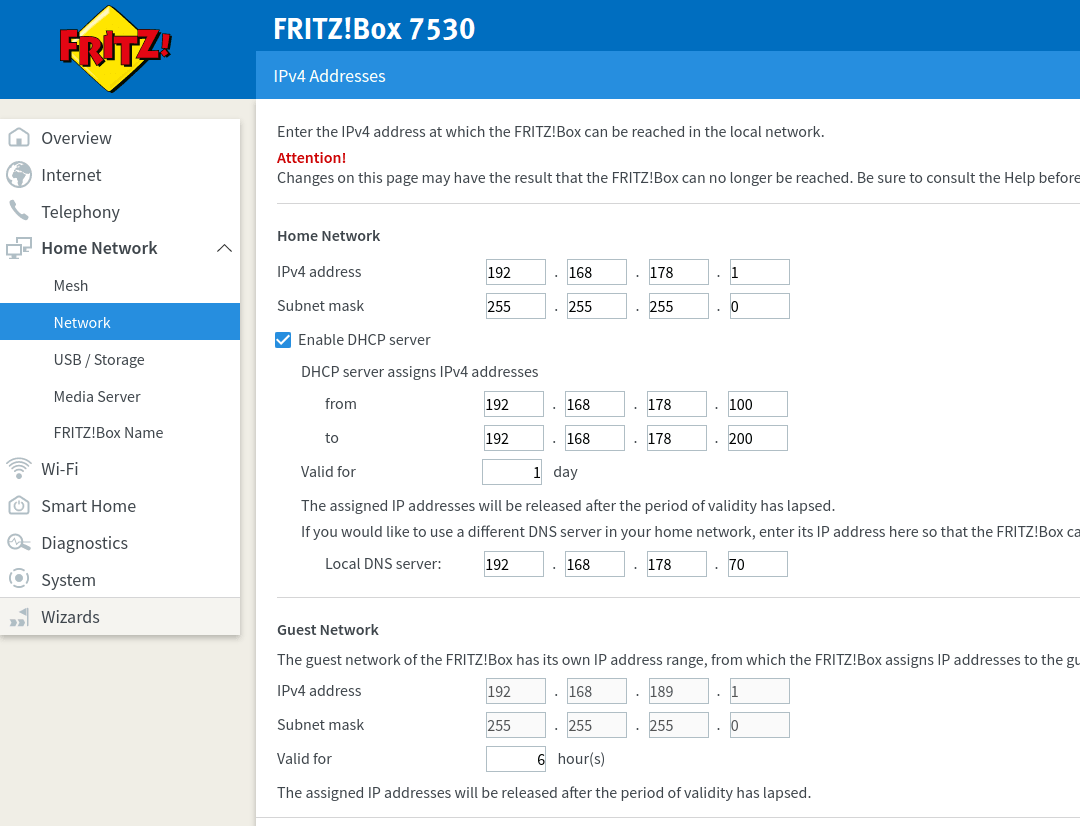
A good understanding of your home network is essential to get MetalLB to work correctly. First we need to workout our network address space, on my router under the home network settings we can see the IPv4 address and subnet mask which when written in CIDR notation is 192.168.178.0/24. The IP address of the router is 192.168.178.1 your network may vary but should be similar.
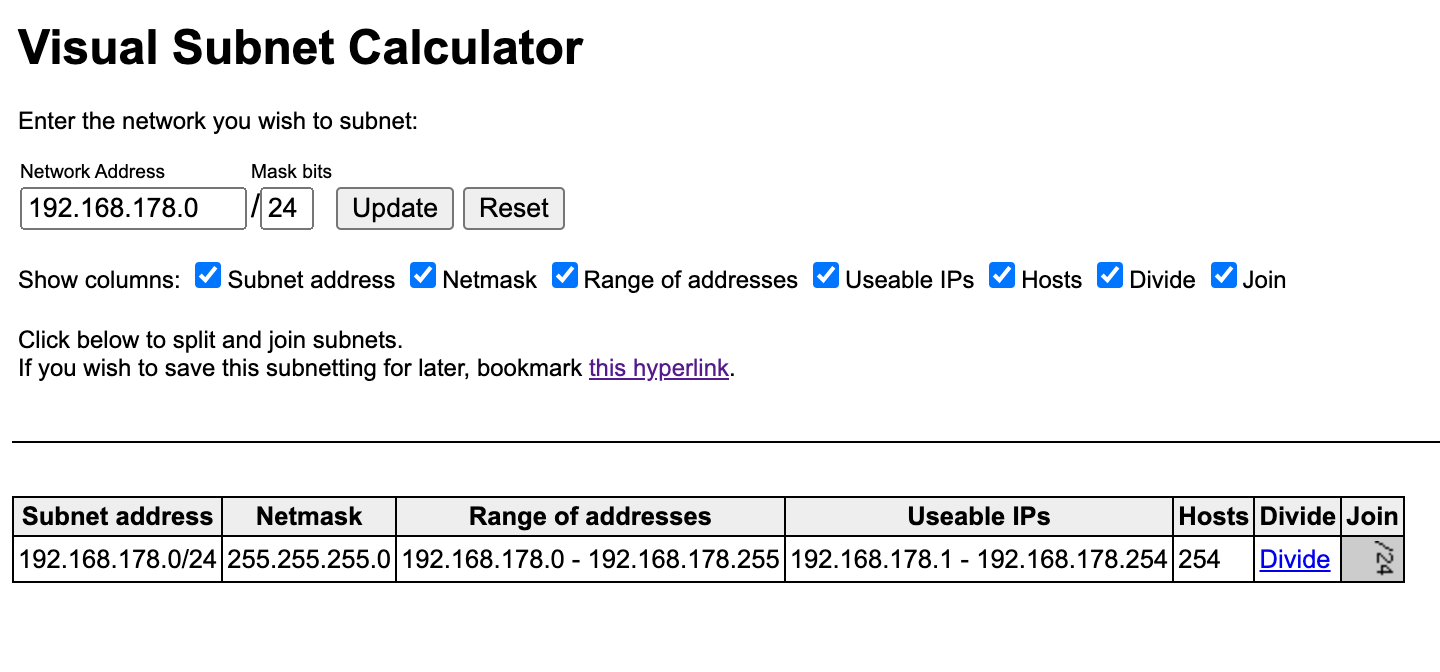
The key bits of information we need are what IP addresses are available in our network and which are free for us to allocate to MetalLB. I find a good tool for this is the Visual Subnet Calculator from Sargasso if you enter the IPv4 address into the network address box and set the mask bits to 24 and click update, it’ll let you know what the address should be 192.168.178.0 and you can check the netmask (select the option) against what your router is reporting.
Assuming everything matches we can now see our usable IPs which for us are 192.168.178.1-192.168.178.254 giving us a total of 254 IPs for the home network. We can see on the router that it is using 192.168.178.100-192.168.178.200 for DHCP (the IPs it hands out when a device joins the network). This means the pool of IPs we have available to MetalLB are:
- 192.168.178.2-192.168.178.99 (minus the addresses for the Pi nodes)
- 192.168.178.201-192.168.178.254
I’m going to use 192.168.178.201-192.168.178.254 for MetalLB, which I’ll make a note of and come back to later.
Disable KlipperLB
We can’t have two Load Balancers so KlipperLB needs to be disabled, thankfully this is pretty easy to do.
- SSH onto the master node.
-
Update the
/etc/systemd/system/k3s.servicefile around line 10 afterExecStart=/usr/local/bin/k3s serveryou need to add--disable servicelbflag as per below.[Unit] Description=Lightweight Kubernetes Documentation=https://k3s.io After=network-online.target [Service] Type=notify ExecStartPre=-/sbin/modprobe br_netfilter ExecStartPre=-/sbin/modprobe overlay ExecStart=/usr/local/bin/k3s server --disable servicelb --data-dir /var/lib/ran> KillMode=process ... - After making the change, save and exit
Ctrl+XthenYandEnter. - Now we need to restart K3s for the changes to take effect.
sudo systemctl daemon-reload && sudo systemctl restart k3s
Installing MetalLB
Lets install MetalLB and get it assigning IP addresses for services.
We can apply a manifest file for MetalLB to install version 0.13.11 which was the latest at the time of this article.
kubectl apply -f https://raw.githubusercontent.com/metallb/metallb/v0.13.11/config/manifests/metallb-native.yaml
Once that’s run we can confirm that MetalLB is running by checking the pods in the metallb-system namespace.
kubectl get pods -n metallb-system
Which should return something similar to.
NAME                          READY   STATUS    RESTARTS     AGE
controller-7d56b4f464-2bvdg   1/1     Running   2 (2d ago)   2d2h
speaker-nqk44                 1/1     Running   2 (2d ago)   2d2h
speaker-6kshp                 1/1     Running   2 (2d ago)   2d2h
speaker-clw8w                 1/1     Running   4 (2d ago)   2d2h
The controller is responsible for allocating IP addresses and the speakers broadcast which node will respond to the request on that IP.
Configuring IP addresses to be assign to the Load Balancer Services
We need to tell MetalLB which IPs (which we identified eariler) it can use, to do this we’ll create a manifest file as per below.
---
apiVersion: metallb.io/v1beta1
kind: IPAddressPool
metadata:
  name: default
  namespace: metallb-system
spec:
  addresses:
  - 192.168.178.201-192.168.178.254
Save as a yaml file called metallb-ips.yaml and apply it to the cluster.
kubectl apply -f metallb-ips.yaml
Once applied it’ll now be assigning external IPs on our network for any new Kubernetes Services.
Announcing the Service IPs
Having an external IP is only half of the battle, next we need a way of linking the IP with the service that is running on a node. We are going to use the Layer 2 config option which respondes to ARP requests on our network to give the MAC address of a node to clients to route the request.
Lets create another manifest file called metallb-l2.yaml with the below contents.
---
apiVersion: metallb.io/v1beta1
kind: L2Advertisement
metadata:
  name: l2
  namespace: metallb-system
Lets apply it to the cluster
kubectl apply -f metallb-l2.yaml
We now have everything we need to test our setup which we’ll do next.
Testing MetalLB assigns and serves IP addresses for Services
To test MetalLB actually works I’m going to deploy Nginx and expose it with a LoadBalancer.
kubectl create deploy nginx --image nginx
kubectl expose deploy nginx --port 80 --type LoadBalancer
To find out the address that Nginx is being exposed on we can use kubectl to get more information about the service.
kubectl describe service nginx

Name:                     nginx
Namespace:                default
Labels:                   app=nginx
Annotations:              metallb.universe.tf/ip-allocated-from-pool: default
Selector:                 app=nginx
Type:                     LoadBalancer
IP Family Policy:         SingleStack
IP Families:              IPv4
IP:                       10.43.78.21
IPs:                      10.43.78.21
LoadBalancer Ingress:     192.168.178.202
Port:                     <unset>  80/TCP
TargetPort:               80/TCP
NodePort:                 <unset>  31390/TCP
Endpoints:                10.42.1.33:80
Session Affinity:         None
External Traffic Policy:  Cluster
Events:
  Type    Reason        Age   From                Message
  ----    ------        ----  ----                -------
  Normal  IPAllocated   6s    metallb-controller  Assigned IP ["192.168.178.202"]
  Normal  nodeAssigned  6s    metallb-speaker     announcing from node "hulk" with protocol "layer2"
We can see that the IP 192.168.178.202 as part of a IPAllocated event from metallb-controller and following that metallb-speaker running on hulk announced it.
We can can check if the output by visiting http://192.168.178.202 using a browser on our computer or simply use curl.
curl 192.168.178.202
Which should return the Nginx welcome page
<!DOCTYPE html>
<html>
<head>
<title>Welcome to nginx!</title>
<style>
html { color-scheme: light dark; }
body { width: 35em; margin: 0 auto;
font-family: Tahoma, Verdana, Arial, sans-serif; }
</style>
</head>
<body>
<h1>Welcome to nginx!</h1>
<p>If you see this page, the nginx web server is successfully installed and
working. Further configuration is required.</p>

<p>For online documentation and support please refer to
<a href="http://nginx.org/">nginx.org</a>.<br/>
Commercial support is available at
<a href="http://nginx.com/">nginx.com</a>.</p>

<p><em>Thank you for using nginx.</em></p>
</body>
</html>
There we have it, a K3s Raspberry Pi cluster with MetalLB configured and serving traffic on our local network. Hope you’ve enjoyed setting this up, and if you’ve gotten to the end of this post well done :)